- DC Blog RSS Feed
- [Updated] Free Mobile-Friendly Layout Wizard
- [Fixed] Feedback Form Wizard
- GitHub patch release previous version
- 15 years of blogging 500 posts later
- How to disable Laravel console commands
- Vue show and hide form elements
- Extracting a time into select menus with PHP
- Running HTTP requests in PhpStorm
- VIM shortcuts

آخرین مطالب
امکانات وب
DC Blog RSS Feed https://dcblog.dev DC Blog RSS Feed EN Composer Scripts: Boosting Your Team's Efficiency https://dcblog.dev/composer-scripts-boosting-your-teams-efficiency https://dcblog.dev/composer-scripts-boosting-your-teams-efficiency Fri, 12 Apr 2024 11:26:00 GMT How to disable Laravel console commands https://dcblog.dev/how-to-disable-laravel-console-commands Suppose you find yourself in a situation where you need to disable or intercept a console command in Laravel. This tutorial will primarily focus on how to intercept the `php artisan migrate` command. We'll delve into the command method `app/Console/Keel.php` and explore how to prevent the migrate command from executing any actions.]]> https://dcblog.dev/how-to-disable-laravel-console-commands Mon, 05 Feb 2024 11:49:00 GMT 15 years of blogging 500 posts later https://dcblog.dev/15-years-of-blogging-500-posts-later You know, it's funny how the big milestones can sneak up on us.]]> https://dcblog.dev/15-years-of-blogging-500-posts-later Mon, 05 Feb 2024 11:30:0 Recent Questions...ادامه مطلب
ما را در سایت Recent Questions دنبال می کنید
برچسب : نویسنده : استخدام کار superuser بازدید : 6
Updated: TheFree Mobile-Friendly Layout Wizardhas been updated. It will now place the meta charset tag before the title in the head section (so that it will be in the first 1 KB of your page even if you have a long title). In addition, if you select HTML5 as the output type, the shorter meta charset tag will be used.
Recent Questions...ما را در سایت Recent Questions دنبال می کنید
برچسب : نویسنده : استخدام کار superuser بازدید : 5
The Feedback Form Wizardhas been fixed so that it can now, once again, create the CAPTCHA versions (ReCAPTCHA and hCaptcha) of the script. Apparently, somewhere along the line, I seem to have broken it during one of my inteal updates. I'm very sorry for the inconvenience. Note: you do not have to recreate your script if you successfully generated it before. (The problem was that under certain conditions, the wizard choked and died before it could generate a script. So if you actually received a script, you are fine.)
Recent Questions...ما را در سایت Recent Questions دنبال می کنید
برچسب : نویسنده : استخدام کار superuser بازدید : 5
On Github you way from time to time need to patch release the previous version of a published release.
This took me longer than I care to admit to understand the steps involved. Hence I'm documenting them in this post.
Step 1: Check out the branch corresponding to the previous version of your code.
git checkout 7.3.0
Step 2: Fix the bug in the code.
Let's say it's a breaking change that's been fixed in the code.
Step 3: Commit the changes with a version number that indicates the patch release.
Commit the fix
git commit -m "Fix bug in 7.3.0"
Next, create a new tag
git tag 7.4.0
Step 4: Push the changes to the remote repository.
git push origin 7.4.0
Step 5: Create a new release for the patch version on GitHub.
Navigate to the main page of the repository on GitHub.com, click on the Releases tab, and then click on the "Draft a new release" button.
Step 6: Fill in the details for the release in the form, select the tag created from Step 3, and fill in the release notes.
Once you have filled in the details, click on the "Publish release" button to publish the release. Recent Questions...ادامه مطلب
ما را در سایت Recent Questions دنبال می کنید
برچسب : نویسنده : استخدام کار superuser بازدید : 21
 You know, it's funny how the big milestones can sneak up on us. Just as I was putting the finishing touches on my recent Headless Hashnode tutorial, I realized it's been 15 years since I started this blogging jouey—and what's more, I was just 1 post away from blog update 500!
It got me thinking about how this whole blogging adventure has shaped my career in web development. I’ve had the same enthusiasm for sharing my experiences as I have for coding, and what better way to commemorate this occasion than to share a bit of that story?
Getting started
It all started back in 2009 as a university student studying web design at the since-closed Hull School of Art and Design, An early assignment was creating a blog, not even a dynamically driven one - although mine certainly was - and the content expectations were simple too, just a post or 2 for every semester.
For me, I began pouring my newfound knowledge into blog posts or tutorials—basic at first, like a PHP script connecting to a MySQL database. As time went on and my understanding broadened, so did the richness of my content.
A huge motivation at the time was how helpful this content was for my classmates. I've always loved helping people, and seeing my content become a go-to reference for those around me boosted my confidence to no end.
Tinkering and Transformation
As the content of my blog evolved so did the blog platform itself. I've always loved deep-diving into how things work, and creating a blog has always been a cycl Recent Questions...
You know, it's funny how the big milestones can sneak up on us. Just as I was putting the finishing touches on my recent Headless Hashnode tutorial, I realized it's been 15 years since I started this blogging jouey—and what's more, I was just 1 post away from blog update 500!
It got me thinking about how this whole blogging adventure has shaped my career in web development. I’ve had the same enthusiasm for sharing my experiences as I have for coding, and what better way to commemorate this occasion than to share a bit of that story?
Getting started
It all started back in 2009 as a university student studying web design at the since-closed Hull School of Art and Design, An early assignment was creating a blog, not even a dynamically driven one - although mine certainly was - and the content expectations were simple too, just a post or 2 for every semester.
For me, I began pouring my newfound knowledge into blog posts or tutorials—basic at first, like a PHP script connecting to a MySQL database. As time went on and my understanding broadened, so did the richness of my content.
A huge motivation at the time was how helpful this content was for my classmates. I've always loved helping people, and seeing my content become a go-to reference for those around me boosted my confidence to no end.
Tinkering and Transformation
As the content of my blog evolved so did the blog platform itself. I've always loved deep-diving into how things work, and creating a blog has always been a cycl Recent Questions...ما را در سایت Recent Questions دنبال می کنید
برچسب : نویسنده : استخدام کار superuser بازدید : 13
 Suppose you find yourself in a situation where you need to disable or intercept a console command in Laravel. This tutorial will primarily focus on how to intercept the php artisan migrate command. We'll delve into the command method app/Console/Keel.php and explore how to prevent the migrate command from executing any actions.
Inside the command method of app/Console/Keel.php
In Laravel 11 use routes/console.php
Intercept command
You can intercept php artisan migrate and, instead, catch it and use a closure.
Artisan::command('migrate', function () { //
});
This would essentially stop the migrate command from doing anything.
You could then print a message out:
Artisan::command('migrate', function () { $this->info('Command NOT AVAILABLE. Use this: php artisan app:migrate');
});
Running an alteative command:
To run a different command:
Artisan::command('migrate', function () { $this->call('app:migrate');
});
In this case, a new command called app:migrate would be executed.
Run command with a --path option:
Artisan::command('migrate', function () { $this->call('app:migrate', [ '--path' => 'database/migrations' ]);
});
Now when running php artisan migrate you will get an error:
The "--path" option does not exist.
The reason for this is the custom command does not have a path option. Lets create the command and add the option.
Create a command:
php artisan make:command AppMigrate
This creates a class called AppMigrate.php inside Recent Questions...
Suppose you find yourself in a situation where you need to disable or intercept a console command in Laravel. This tutorial will primarily focus on how to intercept the php artisan migrate command. We'll delve into the command method app/Console/Keel.php and explore how to prevent the migrate command from executing any actions.
Inside the command method of app/Console/Keel.php
In Laravel 11 use routes/console.php
Intercept command
You can intercept php artisan migrate and, instead, catch it and use a closure.
Artisan::command('migrate', function () { //
});
This would essentially stop the migrate command from doing anything.
You could then print a message out:
Artisan::command('migrate', function () { $this->info('Command NOT AVAILABLE. Use this: php artisan app:migrate');
});
Running an alteative command:
To run a different command:
Artisan::command('migrate', function () { $this->call('app:migrate');
});
In this case, a new command called app:migrate would be executed.
Run command with a --path option:
Artisan::command('migrate', function () { $this->call('app:migrate', [ '--path' => 'database/migrations' ]);
});
Now when running php artisan migrate you will get an error:
The "--path" option does not exist.
The reason for this is the custom command does not have a path option. Lets create the command and add the option.
Create a command:
php artisan make:command AppMigrate
This creates a class called AppMigrate.php inside Recent Questions...ما را در سایت Recent Questions دنبال می کنید
برچسب : نویسنده : استخدام کار superuser بازدید : 14
 Introduction
When working with forms, it is common to display or conceal various fields based on the options selected.
I'll use Vue to conditionally show or hide form elements.
In this example, I'm going to use an SFC (Single File Component) for ease of us. You'll see this in full in the putting it all together section below.
For this to work it does not need to use a SFC, the HTML and JS will work when used in traditional setups i.e. having JS in javascript blocks and the HTML in a page's body.
Creating the form elements
Here I have 2 select elements, imagine the insurance type should only be displayed if the answer to Do you want insurance? was Yes
<div> <label for="insurance">Do you want insurance?</label> <select id="insurance"> <option value="">Select</option> <option>Yes</option> <option>No</option> </select>
</div>
<div> <label for="insuranceType">Insurance Type</label> <select id="insuranceType"> <option value="">Select</option> <option>Home</option> <option>Travel</option> </select>
</div>
Binding Form Elements
First, we need to create variables to bind the elements. Inside a script tag define a const for each element.
<script setup>
import {ref} from "vue";
const insurance = ref();
const insuranceType = ref();
</script>
Notice that Recent Questions...
Introduction
When working with forms, it is common to display or conceal various fields based on the options selected.
I'll use Vue to conditionally show or hide form elements.
In this example, I'm going to use an SFC (Single File Component) for ease of us. You'll see this in full in the putting it all together section below.
For this to work it does not need to use a SFC, the HTML and JS will work when used in traditional setups i.e. having JS in javascript blocks and the HTML in a page's body.
Creating the form elements
Here I have 2 select elements, imagine the insurance type should only be displayed if the answer to Do you want insurance? was Yes
<div> <label for="insurance">Do you want insurance?</label> <select id="insurance"> <option value="">Select</option> <option>Yes</option> <option>No</option> </select>
</div>
<div> <label for="insuranceType">Insurance Type</label> <select id="insuranceType"> <option value="">Select</option> <option>Home</option> <option>Travel</option> </select>
</div>
Binding Form Elements
First, we need to create variables to bind the elements. Inside a script tag define a const for each element.
<script setup>
import {ref} from "vue";
const insurance = ref();
const insuranceType = ref();
</script>
Notice that Recent Questions...ما را در سایت Recent Questions دنبال می کنید
برچسب : نویسنده : استخدام کار superuser بازدید : 72
 That begs the question how do you separate the time into seperate elements?
Making use of explode can work. Exploding where there a : so:
$parts = explode(':', '14:25:00');
This would result in an array:
[ "14", "25", "00",
]
To use an element you can refer to its index for example $parts[0] would contain 14
Using them by their index is fine to do but kinda messy.
I prefer to give each element a name using the list function
list($hours, $minutes, $seconds) = explode(':', '14:25:00');
When using list() passing an array to it will allow you to name each index of the array in the order listed.
Putting this into practice I like to define the null versions before using list to ensure the variables will exist.
$estimatedTime = 14:25:00;
$estimatedHour = null;
$estimatedMinute = null;
$estimatedSeconds = null;
list($estimatedHour, $estimatedMinute, $estimatedSeconds) = explode(':', $estimatedTime);
Now we have the variables that can be used in select menus:
note I'm using Blade syntax here for readability.
<select name="estimatedTime_hour"> <option value="0">Hours</option> @foreach(range(0,23) as $hour) <option value="{{ $hour }}" {{ old('estimatedTime_hour', $estimatedHour) == $hour ? 'selected=selected' : '' }}>{{ $hour }}</option> @endforeach
</select>
<select name="estimatedTime_minute"> <option value="0">Minutes&l Recent Questions...
That begs the question how do you separate the time into seperate elements?
Making use of explode can work. Exploding where there a : so:
$parts = explode(':', '14:25:00');
This would result in an array:
[ "14", "25", "00",
]
To use an element you can refer to its index for example $parts[0] would contain 14
Using them by their index is fine to do but kinda messy.
I prefer to give each element a name using the list function
list($hours, $minutes, $seconds) = explode(':', '14:25:00');
When using list() passing an array to it will allow you to name each index of the array in the order listed.
Putting this into practice I like to define the null versions before using list to ensure the variables will exist.
$estimatedTime = 14:25:00;
$estimatedHour = null;
$estimatedMinute = null;
$estimatedSeconds = null;
list($estimatedHour, $estimatedMinute, $estimatedSeconds) = explode(':', $estimatedTime);
Now we have the variables that can be used in select menus:
note I'm using Blade syntax here for readability.
<select name="estimatedTime_hour"> <option value="0">Hours</option> @foreach(range(0,23) as $hour) <option value="{{ $hour }}" {{ old('estimatedTime_hour', $estimatedHour) == $hour ? 'selected=selected' : '' }}>{{ $hour }}</option> @endforeach
</select>
<select name="estimatedTime_minute"> <option value="0">Minutes&l Recent Questions...ما را در سایت Recent Questions دنبال می کنید
برچسب : نویسنده : استخدام کار superuser بازدید : 47
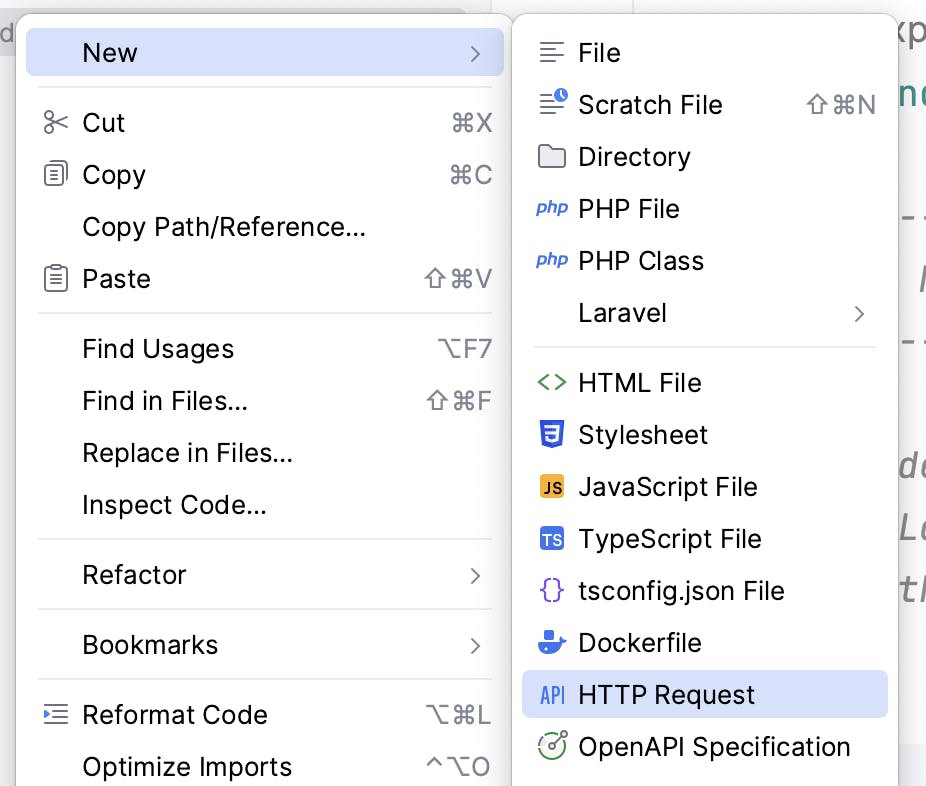 Running API tests you may be tempted to open PostMan or another API client, did you know, you can run HTTP requests from inside PhpStorm directly?
When developing a new API, you will want to run the API endpoints. Being able to run them without leaving PhpStorm speeds up your workflow.
To start a request file, you can either select a HTTP Request file when using the new file or create a new scratch file.
For a scratch file select the HTTP Request type.
In either case a file ending in .http for example scratch.http You can name the file anything you like and have multiple files.
The difference between having .http files in your projects and a scratch file is a scratch file is only stored in your .idea folder and not inside your project files, (outside of version control.
Demo API
Throughout this post, I will be using a sample public API https://reqres.in/
Request Format
To create a request enter the type of request (GET, POST, PUT, PATCH, DELETE) followed by the URL to fetch.
You can also set headers by typing them in the format of key:value
If you need to pass through a body then type that out with a line break in a json format.
Use ### to separate each request.
Method Request-URI HTTP-Version
Header-field: Header-value
Request-Body
###
Get Request
To create a GET request type GET followed by the URL to fetch.
You can also set headers by typing them in the forma Recent Questions...
Running API tests you may be tempted to open PostMan or another API client, did you know, you can run HTTP requests from inside PhpStorm directly?
When developing a new API, you will want to run the API endpoints. Being able to run them without leaving PhpStorm speeds up your workflow.
To start a request file, you can either select a HTTP Request file when using the new file or create a new scratch file.
For a scratch file select the HTTP Request type.
In either case a file ending in .http for example scratch.http You can name the file anything you like and have multiple files.
The difference between having .http files in your projects and a scratch file is a scratch file is only stored in your .idea folder and not inside your project files, (outside of version control.
Demo API
Throughout this post, I will be using a sample public API https://reqres.in/
Request Format
To create a request enter the type of request (GET, POST, PUT, PATCH, DELETE) followed by the URL to fetch.
You can also set headers by typing them in the format of key:value
If you need to pass through a body then type that out with a line break in a json format.
Use ### to separate each request.
Method Request-URI HTTP-Version
Header-field: Header-value
Request-Body
###
Get Request
To create a GET request type GET followed by the URL to fetch.
You can also set headers by typing them in the forma Recent Questions...ما را در سایت Recent Questions دنبال می کنید
برچسب : نویسنده : استخدام کار superuser بازدید : 45
 VIM Modes
There are multiple modes in vim, normal mode is loaded by default.
Command mode. Press : from normal mode, This mode is used when escape is pressed.
Insert mode. Press i to enter insert mode, from here typing is allowed within the file.
Visual mode. Press v to enter visual mode from here you can select and move lines.
Visual line. Press capital V to enter visual line mode, this will select entire lines.
By default command mode will be loaded to run command type : followed by the command
in terminal type vim to enter vim or vi file/path to create a file or edit a file if the path already exists.
Edit File (must be inside vim for this to work)
:e file/path - open a file from a vim instance
Save and write to file
:q = quit:qw = quit and write to the file:q! = quit and discard any changes:w = write to the file aka save
from normal mode pressing a will tu on edit mode and place the cursor 1 character forward. The difference between pressing i and a is i will leave the curse in the same position whilst a will move the cursor forward a character.
Movement:
Move around by pressing these keys:
h = move left.j = move down.k = move up.l = move right.
gg = move to the top of the file.
shift + g move to the bottom of the file.
zz = move the current line to the center of the screen. Recent Questions...
VIM Modes
There are multiple modes in vim, normal mode is loaded by default.
Command mode. Press : from normal mode, This mode is used when escape is pressed.
Insert mode. Press i to enter insert mode, from here typing is allowed within the file.
Visual mode. Press v to enter visual mode from here you can select and move lines.
Visual line. Press capital V to enter visual line mode, this will select entire lines.
By default command mode will be loaded to run command type : followed by the command
in terminal type vim to enter vim or vi file/path to create a file or edit a file if the path already exists.
Edit File (must be inside vim for this to work)
:e file/path - open a file from a vim instance
Save and write to file
:q = quit:qw = quit and write to the file:q! = quit and discard any changes:w = write to the file aka save
from normal mode pressing a will tu on edit mode and place the cursor 1 character forward. The difference between pressing i and a is i will leave the curse in the same position whilst a will move the cursor forward a character.
Movement:
Move around by pressing these keys:
h = move left.j = move down.k = move up.l = move right.
gg = move to the top of the file.
shift + g move to the bottom of the file.
zz = move the current line to the center of the screen. Recent Questions...ما را در سایت Recent Questions دنبال می کنید
برچسب : نویسنده : استخدام کار superuser بازدید : 150
آرشیو مطالب
لینک دوستان
- کرم سفید کننده وا
- دانلود آهنگ جدید
- خرید گوشی
- فرش کاشان
- بازار اجتماعی رایج
- خرید لایسنس نود 32
- هاست ایمیل
- خرید بانه
- خرید بک لینک
- کلاه کاسکت
- موزیک باران
- دانلود آهنگ جدید
- ازن ژنراتور
- نمایندگی شیائومی مشهد
- مشاوره حقوقی تلفنی با وکیل
- کرم سفید کننده واژن
- اگهی استخدام کارپ
- دانلود فیلم
- آرشیو مطالب
- فرش مسجد
- دعا
- لیزر موهای زائد
- رنگ مو
- شارژ